There are different reasons for why you may want to download emails from Office 365 to your desktop computer. Your Microsoft 365 subscription is ending, and you don’t need to renew your subscription. To avoid losing email data, you want to export email from Office 365. Another use case to export emails from Office 365 is the need for email backup. When you have a copy of email data on a computer on-premises, you feel safer and mitigate issues related to interruptions to internet services. This blog post explains how to save emails from Office 365 webmail and how to save an email to desktop by using a standalone email client. It covers different methods: for example, saving one Microsoft 365 email message to one file and saving multiple messages to a single file. Read the blog post and select the method that works best for you.
Exporting to PDF from Outlook Online
With this method, you can use a virtual PDF printer, which prints an email message to a PDF file, and, as a result, allows you to export email from Office 365 to the PDF file format. You can then save this PDF file on your desktop machine.
Log into Office 365 by using your Microsoft 365 account in a web browser, and open Outlook Online to access your Microsoft 365 email.
Select the needed email message that is stored in the appropriate mail folder.
Click the three dots … and in the menu that opens, hit Print.

A new window appears in the web interface of Outlook Online.
You see the preview of the Microsoft 365 email message that you are about to export.
Click Print to continue and go to the list of physical and virtual printers available in your operating system.

In the Destination section of the Print page, select the needed printer in the drop-down list. You should select a virtual printer that prints a Microsoft 365 email message to a PDF file. In this example, I select the printer with the name Microsoft Print to PDF. There are alternative options in my case – Save to PDF and Adobe PDF.
Note: An additional virtual Adobe PDF printer is installed in the system when you install Adobe Acrobat.
Click Print to save the file.

Enter a name and browse for the location where to save the PDF file.
Exporting to PDF in Microsoft Office Outlook
If you use a standalone version of Microsoft Office Outlook installed in Windows, you have more options to save Microsoft 365 email messages to different file formats on your desktop computer. Let me explain how to save a Microsoft 365 email message to desktop in PDF file format in Microsoft Office Outlook 2016. By default, there is no direct option to save an email message in PDF format in Microsoft Office Outlook, but there are workarounds that allow you to do that.
You need to configure your account in Microsoft Office Outlook to send and receive Microsoft 365 email by using a standalone email client. Read how to configure an email client installed on your machine to work with Microsoft email on your computer.
Select the email message in Microsoft Office Outlook that you want to save as a PDF file on your computer.

Click File > Print to open settings for printing.

Select a printer in the drop-down menu of the Print page of Microsoft Office Outlook. You need to select a virtual printer that prints email messages to PDF file. Select Microsoft Print to PDF in the list of printers. You can also select another virtual PDF printer if you have other printers installed in your operating system. Modern Windows versions provide a virtual Microsoft PDF printer. In older Windows versions, you can install the needed utility that provides a virtual PDF printer manually.
Then hit Print to send the selected Microsoft 365 email message to the virtual printer.

Enter the file name, select file location where to save the PDF file, and click Save to finish.

How to Save a Microsoft 365 Email to Different File Formats in Outlook
If you use a standalone version of Microsoft Office Outlook installed on your computer, you can export emails from Office 365 to other file formats than PDF. Let’s explore how to export emails to other formats.
Select the Microsoft 365 email message that you want to export in Microsoft Office Outlook (explained in the previous section).
Then click File > Save As.

Browse for the location where to save the file on your desktop and enter a file name. The subject name defined in the Microsoft 365 email message is used as the name for the exported file by default.
Select one of the supported file types (Save as type):
- TXT – a plain text file without images and other data.
- OFT – an Outlook template file that is used to make templates for creating new emails.
- MSG (Outlook message format). This is an older version of the MSG file. Not all Unicode characters are supported.
- MSG (Outlook message format – Unicode). This is a newer version of the MSG file format. This type of the MSG format is preferred because the full range of Unicode characters is supported.
- HTML – a web page file format to which an email message can be exported. All components used to display an HTML page from an HTML file are saved as separate files in a subdirectory linked to the HTML file. As a result, you have more small files (that require more time to be copied if you’re copying a large number of saved pages) on a disk drive.
- MHT – a web page archive file format. All content including text, images, and other HTML data is saved to a single file that can be opened in a web browser. The MHT file format can also have the MHTML file extension.
Click Save to finish and save the file.

Note that exporting a large number of Microsoft 365 email messages to individual files make searching for data in these exported messages difficult.
How to Download Emails from Office 365 to a PST File
You can save all Microsoft 365 email messages for your Microsoft 365 account to a PST file by using a standalone Outlook client installed in your operating system as part of the Microsoft Office suite. Microsoft Office Outlook must be configured for your account to work with POP3 and SMTP servers of Microsoft, and emails must be already downloaded in Microsoft Office Outlook before you can export emails to a PST file.
A PST (Personal Storage Table) file is the Outlook data file that contains all email items saved by an email client on a disk drive. When it comes to Outlook, POP3 email accounts usually store associated data in PST files. IMAP accounts in Outlook 2013 and earlier store data in PST files. Later Outlook versions store data in OST files for IMAP accounts.
The advantage of copying or exporting Microsoft 365 emails to a PST file is that file attachments are also saved in a PST file. You have all the needed content in PST files unlike what you get after exporting emails to TXT, HTML, or PDF files. When opened in Outlook, PST files allow you to perform indexed searches.
Click File, and on the Account Information page, select the needed Microsoft 365 email account in the drop-down list. Then click Account Settings, and click Account Settings once again.

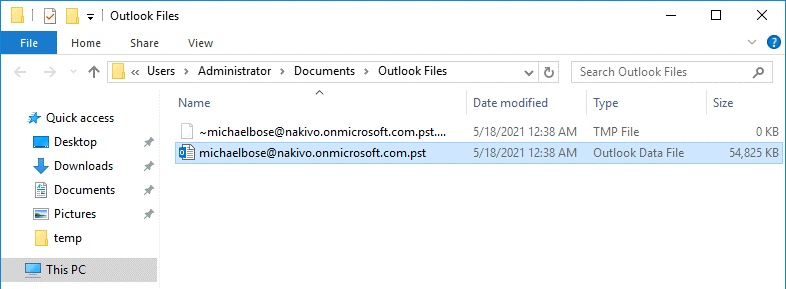
Select the Data Files tab in the Account Settings window and click Open File Location.

As I’m using Windows, my PST file is displayed in the new window that opens in Windows Explorer. Copy the PST file used to store email data for your Microsoft 365 email, and paste this file to a safe location. This copy of the PST file can be considered as a Microsoft 365 email backup.
How to Export Email from Office 365 to CSV and PST
If you use a standalone version of Microsoft Office Outlook, here are tips on how to save email messages for your Office 365 account. You can export custom data from the email client to CSV and PST files. CSV files can be opened in Microsoft Excel. Information stored in CSV files is separated by commas.
Select the needed email message in Microsoft Office Outlook.
Click File > Open & Export and hit Import/Export.
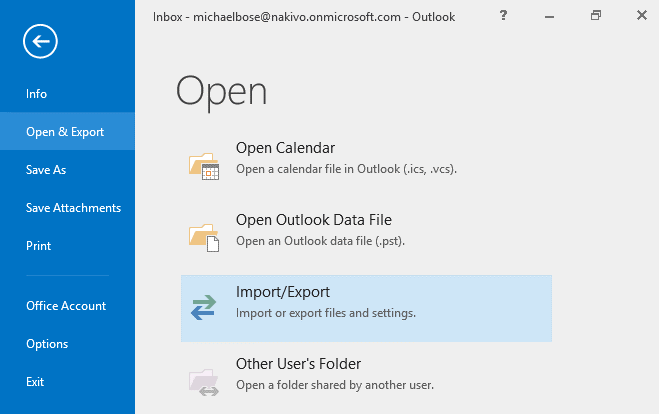
The Import and Export Wizard window opens.
Select Export to a file. Click Next at each step of the wizard to continue.

Create a file of type. Select one of the two available file formats
- Comma Separated Values (.scv)
- Outlook Data File (.pst)
We are going to export emails from Office 365 to a CSV file in this example.

Select a folder to export from. I select the Inbox folder because I need to export emails from Office 365 that are received by my user.

Set the location for file export. Click Browse and select where to save the file. I save my exported file as C:\temp\export01.csv.

In the next window, you can map custom fields for the exported CSV file. Click Finish to start export and close the wizard.

If you use this method to export emails from Office 365 to a PST file, you can export only one email folder. This is the difference between this method and the method explained above where you copy a PST file that contains all email folders available in the Outlook client for your Microsoft 365 email account.
How to Back Up Office 365 Email in NAKIVO Backup & Replication
You can make your life easier by using a dedicated Microsoft 365 email backup solution that allows you to back up emails for the needed accounts, recover mailbox folders or emails to a source location or a custom location. NAKIVO Backup & Replication is a data protection solution that combines all these features and contains many additional features to protect Microsoft 365 email data and other Office 365 data. You can back up emails to a local backup repository on-premises, create multiple recovery points, and perform instant recovery of email messages, attachments, folders, contacts, and calendar items. You can schedule backup jobs (to run automatically) or you can run them on demand (manually).
Let me explain the straightforward process of email recovery in NAKIVO Backup & Replication. Before you can recover emails, you have to add your Microsoft 365 account to the Inventory, create a SaaS Backup Repository, and create a Microsoft 365 backup job. Configuration is explained in details in the blog post about Microsoft 365 email recovery and in the help center. Read also about configuration for SharePoint Online and OneDrive backup.
In order to recover a Microsoft 365 email message or attached file from a backup in NAKIVO Backup & Replication, go to the main page in the web interface of the product, select a backup job, click Recover, and hit Microsoft 365 in the menu that opens.

The Object Recovery Wizard for Microsoft 365 opens. The wizard consists of 5 steps.
- Backup. Select the needed Microsoft 365 mailbox with the Microsoft 365 email messages that you want to recover. In my case, a backup job was created to back up emails of the “Michael Bose” mailbox, and I’m going to select this mailbox to recover. Then select the needed recovery point in the right pane of the interface. Hit Next at each step of the recovery wizard to continue.

- Recovery Account. Select a Microsoft 365 account to which you want to recover the Microsoft 365 email data. In my example, I’m going to select my Office 365 account for data recovery.
Important: Don’t confuse the Microsoft 365 account for the entire Office 365 environment for an organization with a Microsoft 365 account for a user within an organization (such as an email user account).

- Objects. Select objects for Microsoft 365 mailbox available for the selected backup job. Select the checkboxes for the needed emails, email folders, or all emails/attachments in the mailbox. You can also recover contacts and calendars. I select the message from Blog Team Site to Recover. Click the selected message to open the preview of this message.

The preview page opens in the web interface of NAKIVO Backup & Replication. You can see the message body with text and images. One of the advantages of the preview is that you see all attachments in the Attachments section. Click the needed file name and save the attached file to your desktop computer directly from the backup. You can close this page by clicking the X button or the Close Message button and go back to the Objects page that is the third step of the Object recovery wizard. Then you can go to the next step.

- Options. Select the recovery type and overwrite behavior.
Two recovery type options are available:
- Recover to original location
- Recover to mailbox
Three overwrite behavior options are available:
- Rename recovered item if such item exists
- Skip recovered item if such item exists
- Overwrite the original item if such item exists
Click Recover to start the recovery process. After that, you are redirected to step 5 (Finish) where you can switch to the Activities page to check the recovery progress status.

Check the recovered Microsoft 365 email data in the defined location after the recovery process is finished.
Conclusion
This blog post has covered how to export emails from Office 365 and how to save email messages with native Microsoft tools to a desktop computer. Now you know how to back up Office 365 email messages, but native tools don’t provide the necessary functionality for flexible point-in-time restores. If you need to automate your Microsoft 365 email backups, try NAKIVO Backup & Replication, which is a professional data protection solution that supports Exchange Online, OneDrive for Business, and SharePoint Online backup.